Overview
ProHVM (Probus-IT Hyper-V Manager) helps you manage Hyper-V servers and virtual machines from Windows. It is particularly useful on Core installations, where the built-in Microsoft Hyper-V Manager isn't available locally.
From a single console you can manage multiple versions of Hyper-V — from 2008 R2 through 2022 (and likely newer, untested). ProHVM runs on servers, desktops and Core installations, on both 32- and 64-bit Windows.
Installation
Download the installer from files/ProHVM.zip and run it. On a fresh installation you should also enable remote management on the Hyper-V host and reboot it.
Start ProHVM by typing hvm in a Command Prompt, or by clicking the icon
in the Start menu.
Licensing
ProHVM is licensed per managed host. Managing one host from two clients counts as one license; managing two hosts requires two licenses.
Editions
Historically ProHVM shipped in two editions. Both are now free.
| Feature | Standard | Professional |
|---|---|---|
| Create and manage VMs | Yes | Yes |
| VM console access (also on free Microsoft Hyper-V Server) | Yes | Yes |
| Connect to Hyper-V hosts across domains and workgroups | Yes | Yes |
| Monitor VM CPU, memory and more | Yes | Yes |
| Monitor host CPU, memory, disks and event log | Yes | Yes |
| Import VMs | No | Yes |
| Export VMs | No | Yes |
| Storage migration | No | Yes |
| Cluster support (live and quick migrations) | No | Yes |
| Hyper-V Share Nothing migration | No | Yes |
| Hyper-V Replica support | No | Yes |
Free Pro serial
To unlock the Professional features in ProHVM, apply the following serial:
2YTGGJ75I3-XDNWD23SWF-RVEG67HK3QThe same serial can be applied to every host you manage — there is no per-host limit.
Apply a serial
- Connect to the host by expanding it in the server tree.
- Right-click the server and choose
Settingsfrom the popup menu. - In the
Servertab of the Settings dialog, clickChange serial. - Paste or type the serial, then click
OK. - Confirm that the
License typefield has updated to reflect the new license.
User interface
ProHVM is designed to surface as much information as possible in a single main window, so you can do most day-to-day work managing your Hyper-V servers and VMs without switching tools.
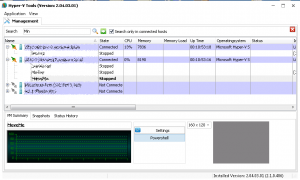
The main window is split into two areas:
- Server tree (top): lists the registered servers and, once you expand a server, its virtual machines.
- Details panel (bottom): shows detailed information for the selected server or virtual machine.
Right-clicking any server or virtual machine opens a popup menu with the actions that can be performed on it.
Managing servers
Connecting to the local server
When ProHVM starts, it checks whether Hyper-V is installed on the local computer. If
it is, the local computer is added to the server tree automatically, with
[localhost] appended to its name.
Connecting to a remote server
To add a remote Hyper-V host, right-click the server tree and choose
Add Server. Fill in the dialog:
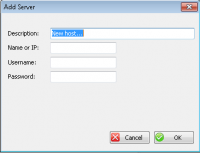
- Description — a friendly name that helps you identify the server.
- Name or IP — the server name or IP address (for example
192.168.1.13,hv01orhv01.domain.local). - Username — a user account with appropriate permissions on the server (
Administrator,computer\Administrator,DOMAIN\Administrator). - Password — the password for that user.
Click OK to add the server. Expand the server node in the tree to connect.
Server info
Selecting a server in the tree displays CPU and memory information for that server in the details panel. From here you can open the Server Settings dialog, run a remote PowerShell session, and browse the host's disks.
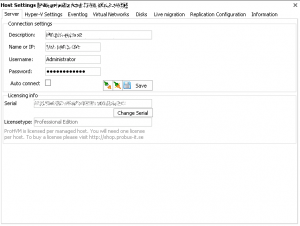
Server Settings dialog
Right-click a server and choose Settings, or click the Settings button in
the Server Info tab.
Server tab
Adjust connection settings and view licensing information. The serial for the host can also be changed here. ProHVM is licensed per host: a single license covers any number of clients connecting to that host, but each additional host you manage requires its own license.
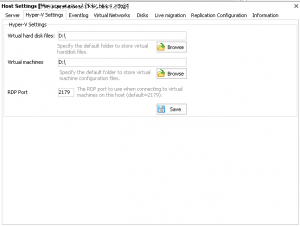
Hyper-V Settings tab
Change the default folders where Hyper-V stores virtual machines and VHD files.
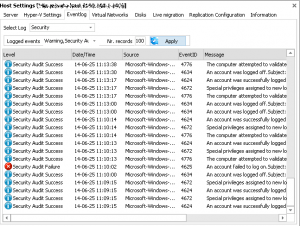
Event Log tab
Inspect the event log of the remote server. Pick a log from the dropdown, then
double-click a record to view its details. The toolbar lets you filter event types
via Logged Events, change the polling cadence with Refresh int.,
and control how many records are fetched with Nr. records. Click
Apply to refresh.
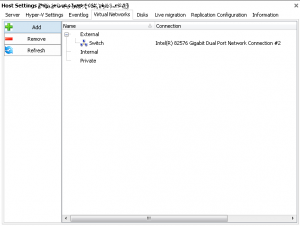
Virtual Networks tab
View, add and remove virtual switches on the server. Switches fall into three categories:
- External — VM to VM on the same host, VM to parent partition, and VM to externally located servers (in both directions).
- Internal — VM to VM on the same host, and VM to parent partition.
- Private — VM to VM on the same host only.
To add a switch, right-click the list and choose Add. Pick the switch type
and — for External switches — the physical adapter to bind to.
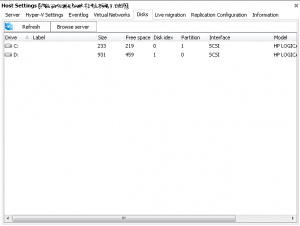
Disks tab
Lists the disks present on the server. A Browse button opens a remote file
browser where you can copy, paste, delete and rename files on the host's disks.
Live Migration tab
Enable or disable Hyper-V live migration and configure its settings.

Replication tab
Enable or disable Hyper-V Replica on the server and adjust its settings.

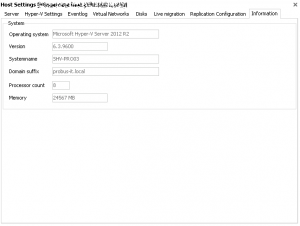
Information tab
General information about the server: OS, version, hostname, domain, CPU count, memory.
Managing virtual machines
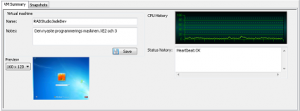
Expand a server in the tree to see its virtual machines. Selecting a VM displays information about it in the details panel — a small preview of the VM screen, a CPU graph, and editable fields for name and notes.
Creating a virtual machine
Right-click the server where you want to create the VM and choose New VM
to open the wizard.
Step 1 — Name and location
Enter a name for the VM and pick a location for its configuration files.

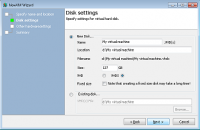
Step 2 — Disk
Choose to create a new VHD or use an existing one. For new disks you can set the name, size, type and location, and optionally create a fixed-size disk.
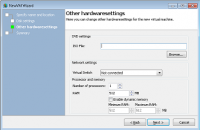
Step 3 — Other hardware
Specify the remaining hardware: an ISO file to attach to the DVD drive, the virtual switch to connect the network card to, and CPU and memory settings.
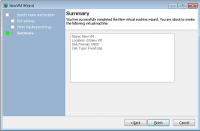
Step 4 — Summary
Review the summary and click Finish to create the VM.
Virtual machine actions
Right-clicking a virtual machine opens a popup menu of actions:
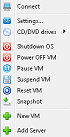
- Start VM
- Shutdown OS — gracefully shut down the guest OS (requires Integration Services).
- Power off VM
- Pause VM — the VM stops running but keeps its memory.
- Suspend VM — saves state and releases memory to the host.
- Reset VM
- Snapshot — captures the VM state, data and hardware configuration.
From here you can also mount ISO files and connect to the VM console.
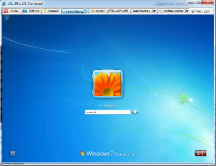
Connecting to / controlling a VM
To install an operating system or interact with a VM you'll often need a console
session. Right-click a VM and choose Connect, or simply double-click it.
Hold SHIFT while doing so to open the connection in cVM
instead.

The toolbar at the top of the Control window gives you:
- Close — closes the connection and the window.
- Connect — connects or reconnects to the VM.
- Smart sizing — toggles smart sizing.
- Full Screen — switches the connection to full-screen mode.
- CTRL+ALT+DEL — sends the key combination to the VM. The local
representation can be changed in the
Select hotkeydropdown; while in full screen, use the chosen combination to sendCTRL+ALT+DELto the guest.
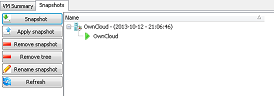
Snapshots
Virtual machine snapshots capture the state, data and hardware configuration of a running VM. Snapshots offer a fast way to revert a VM to a previous state, which is mainly useful in development and test environments — for example to reproduce a specific problem state during troubleshooting.
To take a snapshot, right-click a VM and choose Snapshot, or select the
VM and use the Snapshot tab in the details panel.
VM hardware settings
To add or change VM hardware, right-click the VM and choose Settings. The
dialog lets you add, change and remove hardware including BIOS settings, memory, CPU
count, hard disks (VHD, VHDX) and network cards (including legacy adapters).

- To add hardware, select
Add hardwareon the left and pick the type. - To change existing hardware, select it on the left, change the settings, then click
Apply.
Managing clusters
From version 2.04, ProHVM supports managing clustered VMs. Operations include:
- Quick migration
- Live migration
- Take resources online and offline
- Add a VM to the cluster
- Remove a VM from the cluster
cVM — Connect VM
cVM is a separate application for connecting to virtual machines. It can be started from inside ProHVM or directly from a Command Prompt with switches. On a free Microsoft Hyper-V Server (Core), cVM is the only way to connect to a VM's console.
Save credentials to reuse them
for all future connections to VMs on that host.
To launch cVM from inside ProHVM, hold SHIFT and double-click a VM, or hold SHIFT and pick Connect from the VM's right-click menu.
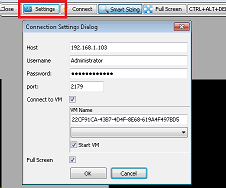
To launch the cVM GUI, type cVM in a Command Prompt — the connection dialog opens.
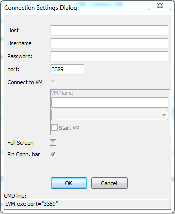
For an RDP session to a remote computer, fill in Host name or IP, username and password
and click OK. To connect to a VM on a host, fill in the same fields, tick
Connect to VM and pick the VM from the dropdown.
. as
the host name and leave the username and password blank.
Using cVM switches
cVM can take every setting as a command-line switch. This makes it possible to create shortcuts to specific VMs or to connect to a VM at sign-in via the Startup folder or the registry.
Host— the computer to connect to, or the host of the VM.Username— the user account to connect as.Password— the password for that user.port— connection port. Typically3389for RDP and2179for VM consoles.VMName— the GUID of the VM (for example13DFE6AD-BD6C-441A-8CFA-7FACBB41D702).ElementName— the friendly name of the VM.VMNameis recommended; usingElementNamemeans cVM has to call Hyper-V to resolve the actual VM, which takes extra time.FullScreen— set to1to start in full-screen mode (default0).PinConnectionBar— set to1to pin the connection bar (default1).StartVM— set to1to start the VM if it isn't already running (default0).
The easiest way to assemble a switch line is to open cVM.exe, fill in the
parameters in the connection dialog, and copy the contents of the CMD line
field at the bottom. If you launch cVM from ProHVM by holding SHIFT
while selecting Connect, most parameters are pre-filled.
To access the settings during an active connection, click Settings in cVM.
Password="«YOURPASS»" — remember to replace it. If you're targeting the
local Hyper-V host, also change the Host parameter to ..
Examples
Connect to a host using RDP:
cVM.exe Host="192.168.1.103" Username="Administrator" Password="Password"Connect to a VM on the local Hyper-V server using VMName:
cVM.exe Host="." VMName="13DFE6AD-BD6C-441A-8CFA-7FACBB41D702"Connect to a VM on the local Hyper-V host using ElementName in full-screen:
cVM.exe Host="." ElementName="MyVMFriendlyName" FullScreen=1Connect to a remote Hyper-V server:
cVM.exe Host="192.168.1.103" Username="Administrator" Password="password" VMName="13DFE6AD-BD6C-441A-8CFA-7FACBB41D702" FullScreen="1" PinConnectionBar="0"